
TL;DR:
- Properly managing ankle sprains involves understanding injury grades, early controlled movement, and completing a staged rehabilitation process. Nutrition, careful pain management, and avoiding premature activity are crucial for optimal ligament healing and preventing re-injury. Progression through swelling reduction, strength building, and proprioception training ensures strength, stability, and safe return to activity.
You rolled your ankle, and now you’re wondering how long this is going to set you back. The ankle sprain recovery process trips up a lot of people, not because it’s complicated, but because the wrong information leads to the wrong choices — too much rest, too little movement, or skipping the rehab exercises once the pain fades. This guide walks you through everything: injury grades, healing timelines, the best exercises for ankle sprain recovery by stage, what to eat, what to avoid, and exactly when you can safely get back to the activities you love.
Table of Contents
- Key takeaways
- Understanding the ankle sprain recovery process from day one
- Progressive rehab exercises by stage
- Nutrition, pain management, and pitfalls to avoid
- Signs of recovery and returning to full activity
- My perspective on what most people get wrong
- How Stridefootankle supports your recovery
- FAQ
Key takeaways
| Point | Details |
|---|---|
| Injury grade shapes your timeline | Grade I heals in 1–2 weeks; Grade III can take 12 weeks or longer and may need surgery. |
| Early movement accelerates healing | Controlled movement starting at 48 hours improves ligament alignment and reduces long-term stiffness. |
| Balance training prevents re-injury | Proprioception exercises are the most overlooked part of recovery and the biggest predictor of future sprains. |
| Nutrition directly supports repair | Protein, vitamin C, and zinc are critical for ligament healing, especially in the first 72 hours. |
| Stopping rehab early is risky | Chronic ankle instability nearly always follows incomplete rehabilitation, even when pain is gone. |
Understanding the ankle sprain recovery process from day one
The ankle sprain recovery process starts the moment you get hurt. What you do in the first 24 to 72 hours matters more than most people realize, and it begins with understanding what you are dealing with.
How sprains are graded
Ankle sprains are classified into three grades based on ligament damage:
- Grade I (mild): Minor stretching of the ligament with no tearing. Expect mild swelling and tenderness. Ankle injury healing time is typically 1 to 2 weeks.
- Grade II (moderate): Partial tearing of the ligament with noticeable swelling, bruising, and some instability. Recovery generally takes 3 to 6 weeks.
- Grade III (severe): Complete ligament tear with significant instability and swelling. Healing can take 6 to 12 weeks or more, sometimes requiring surgical intervention.
Getting this classification right matters. A Grade I sprain managed with aggressive immobilization wastes weeks. A Grade III sprain managed like a Grade I leads to lasting instability. If you cannot bear weight at all, the swelling is severe, or the ankle feels completely unstable, get a professional evaluation before you do anything else.
Applying RICE correctly in the first 72 hours
RICE (Rest, Ice, Compression, Elevation) is still the standard starting point, but it is widely misapplied. Here is how to do each step correctly:
- Rest: Relative rest, not complete immobilization. Keep weight off a painful ankle, but avoid full bed rest. Light, supported movement after 48 hours actually promotes healing.
- Ice: Apply for 15 to 20 minutes every 2 to 3 hours with a thin cloth between the ice and your skin. Never directly on skin.
- Compression: Use an elastic bandage wrapped snugly but not tightly. Numbness or tingling means it is too tight.
- Elevation: Raise your ankle above heart level whenever you are resting to reduce fluid accumulation.
Pro Tip: If you are walking with a noticeable limp or experiencing sharp pain with each step, reduce weight bearing and consider using crutches temporarily. Forcing painful weight through an unstable ankle does not speed things up.
Functional bracing — such as a lace-up ankle brace or semi-rigid support — allows early movement while providing stability. Research shows this approach returns people to activity faster than rigid immobilization. A cast or hard boot may still be appropriate for Grade III sprains, but that is a clinical call.
Progressive rehab exercises by stage
Rehabilitation is not one-size-fits-all. It follows a clear progression, and skipping ahead is one of the most common reasons people re-injure themselves. Think of rehab as a ladder: each rung has to be secure before you move to the next.
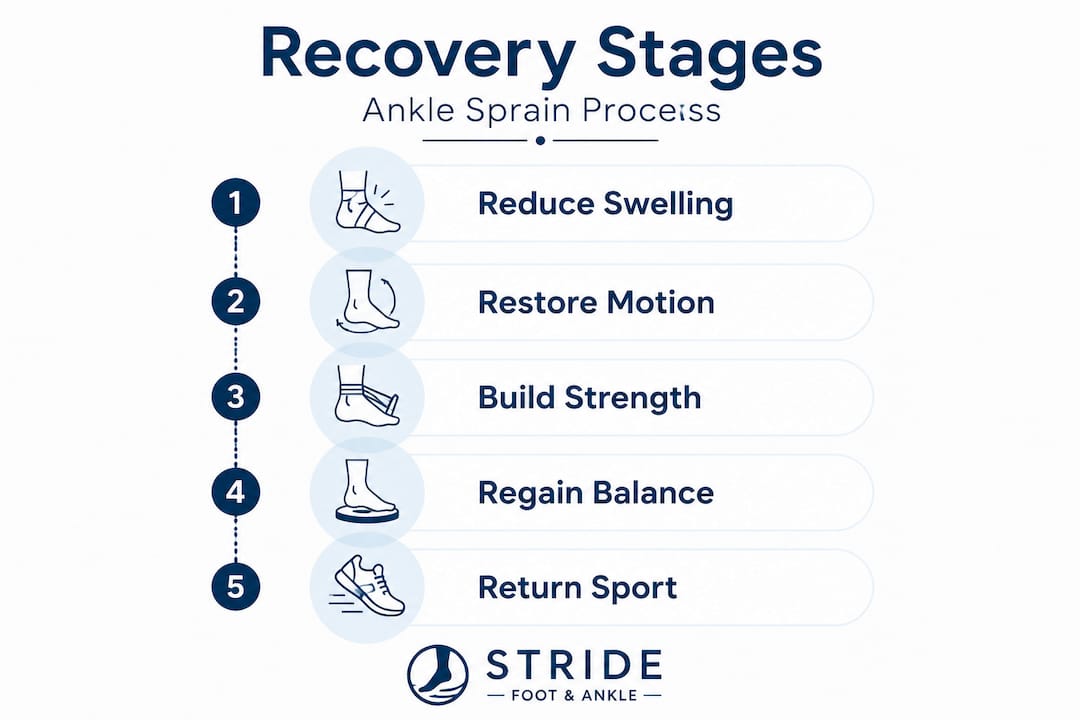
Weeks 0 to 2: Reduce swelling and restore range of motion
Your main goals in this phase are controlling swelling and getting the joint moving again without stressing the healing ligaments. The 0 to 2 week phase focuses on swelling reduction and range of motion work.

Early controlled movement starting after 48 hours improves ligament healing alignment. When new collagen fibers form without movement, they lay down in a disorganized pattern. Guided movement encourages them to align properly along the lines of stress, which produces a stronger, more functional repair.
Exercises for this phase include:
- Ankle alphabet: While seated or lying down, use your big toe to trace the letters of the alphabet in the air. This moves the joint through its full range without load.
- Towel toe curls: Place a small towel on the floor and use your toes to scrunch it toward you. Gentle intrinsic strengthening.
- Gentle ankle circles: Rotate your ankle slowly in both directions. Stop if you feel sharp pain.
- Heel-toe rocking: While seated, rock your foot from heel to toe and back. This restores basic joint mechanics.
Start with one to two sets of each, twice a day. Movement should feel gentle and controlled, not forced.
Weeks 2 to 4: Build strength and restore normal walking
Pain and swelling have significantly reduced by this stage. Now you are rebuilding the muscle strength that protects your ankle during everyday movement. The 2 to 4 week phase focuses on walking mechanics and foundational strength.
- Resistance band exercises: Attach a resistance band to your forefoot and push through plantarflexion (pointing the foot down), dorsiflexion (pulling the toes up), inversion, and eversion. Two to three sets of 15 repetitions each.
- Calf raises: Stand at a counter for support. Rise up onto your toes and lower slowly. Start with two feet, progress to single leg as tolerated.
- Seated towel stretch: Loop a towel around the ball of your foot and gently pull toward you for an Achilles and calf stretch. Hold 30 seconds.
- Short walks on even surfaces: Begin with flat ground, 5 to 10 minutes at a time, increasing gradually as comfort allows.
Pro Tip: If you have access to a pool, water-based walking is excellent during this phase. The buoyancy reduces joint load while still engaging the stabilizing muscles.
Weeks 4 to 12: Balance, proprioception, and sport-specific work
This is the phase most people cut short when the pain is gone. That is a mistake. Balance training restores proprioception, which is your ankle’s ability to sense its position in space and react automatically to uneven surfaces. Without it, you are highly vulnerable to rolling the ankle again.
- Single leg balance: Stand on the injured foot for 30 to 60 seconds. Progress by closing your eyes or standing on a foam pad to increase the challenge.
- Wobble board or balance disc: These unstable surfaces force the ankle stabilizers to work continuously. Start with two feet on the board and progress to one.
- Mini squats on one leg: Bend the knee slightly while balanced on the injured foot. Engages the whole kinetic chain.
- Lateral band walks: Place a resistance band around both ankles and take controlled side steps. Builds the hip and ankle stabilizers together.
- Sport-specific drills (weeks 8 to 12): Jogging, agility ladder work, direction changes, and jumping progressions for athletes or active individuals.
Use a brace or athletic tape during this phase for higher-demand activities. It does not replace strength, but it adds an extra layer of protection while your neuromuscular system fully recovers.
Nutrition, pain management, and pitfalls to avoid
The exercise side of recovery gets most of the attention. What you eat and how you manage pain quietly determines how well and how quickly your ligaments actually repair.
What to eat for ligament healing
Ligament repair depends heavily on nutrition, particularly in the first 72 hours after injury. Key nutrients include:
- Protein: Collagen is made of protein. Include a source of quality protein (chicken, fish, eggs, legumes) at every meal.
- Vitamin C: Directly required for collagen synthesis. Citrus fruits, bell peppers, and strawberries are rich sources.
- Zinc: Supports tissue repair and immune function. Found in beef, pumpkin seeds, and lentils.
- Hydration: Dehydrated tissue heals more slowly. Aim for consistent water intake throughout the day.
You do not need supplements if your diet covers these basics. But if you have been eating poorly since the injury, that is a real factor in your recovery speed.
Using pain medication wisely
NSAIDs such as ibuprofen can help manage early pain, but high-dose NSAID use in the first days after injury may impair the inflammatory response your body needs to begin healing. Use the lowest effective dose, for the shortest time needed, and avoid making them a long-term crutch.
Acetaminophen (Tylenol) is a reasonable alternative for pure pain control without the anti-inflammatory trade-off. For severe pain, consult a clinician about other options.
Common mistakes that slow recovery
Many setbacks in recovery come not from what people do, but from what they skip or overdo. Watch out for these:
- Icing too long: Prolonged icing beyond 20 minutes restricts blood flow and delays tissue repair. Icing controls swelling; it does not accelerate healing.
- Stopping rehab when pain stops: Pain disappearing does not mean the ligament is fully healed. Incomplete rehabilitation is the leading cause of chronic ankle instability and recurrent sprains.
- Returning to high-impact activity too soon: Jumping back into running or sports before completing the proprioception phase almost guarantees re-injury.
- Applying heat in the first 72 hours: Heat increases circulation and swelling in the acute phase. Save heat therapy for the later stages of recovery.
- Skipping compression and elevation at night: Overnight swelling undoes daytime progress. Elevate your leg on a pillow and wear a light compression sock to bed during the first week.
Signs of recovery and returning to full activity
Knowing when you are actually ready to return to normal is one of the trickiest parts of the ankle sprain recovery process. Pain alone is not a reliable measure.
Signs your ankle is healing well
Watch for these positive indicators as you progress through recovery:
| Recovery Stage | Signs of Progress | Appropriate Activity Level |
|---|---|---|
| Week 1 to 2 | Swelling decreasing, full range of motion returning | Rest, gentle ROM exercises, light walking |
| Week 2 to 4 | Walking without limping, strength improving | Strength training, longer walks, light cycling |
| Week 4 to 8 | Full weight bearing pain-free, balance improving | Jogging, agility work, sport-specific drills |
| Week 8 to 12 | Normal strength and balance, no instability | Return to full sport, maintain strength work |
The signs of ankle sprain recovery include being able to balance on the injured leg for 30 seconds without wobbling, walking briskly without compensation, and performing single-leg calf raises equal to the uninjured side.
Warning signs that need professional attention
Some symptoms should prompt you to get evaluated rather than continuing to self-manage:
- Persistent severe swelling beyond two weeks with no improvement
- Numbness, tingling, or burning sensations in the foot
- Sharp clicking or locking of the joint
- Complete inability to bear weight after day three
- A feeling that the ankle “gives way” even during simple walking
These can indicate a fracture, tendon injury, or osteochondral lesion (cartilage damage) that requires imaging and specialist care.
Pro Tip: Before you return to sport, test yourself with the hop test. Stand on the injured leg and hop 10 times in a row. If you feel instability, pain, or compensate by landing unevenly, you are not ready yet. This simple return-to-sport benchmark is more reliable than pain levels alone.
Ongoing strength and balance maintenance after full recovery is your best protection against re-injury. The ligaments are stronger after a well-rehabilitated sprain, but only if the surrounding muscles and neuromuscular system are trained consistently.
My perspective on what most people get wrong
I have seen a pattern repeat itself more times than I can count. Someone sprains their ankle, ices it, rests for a few days, and then goes right back to their normal activity the moment they stop limping. They feel fine. Then three months later, they roll the same ankle again, and they cannot understand why.
The problem is not the original injury. It is the unfinished recovery.
What most people miss entirely is the balance and proprioception phase. This part of rehabilitation is not dramatic. It does not produce the satisfying burn of strength training. You just stand on one foot and try not to wobble. But this is where the real protection is built. After a sprain, the nerve endings inside the ligament that help your brain sense joint position are damaged. If you do not retrain them through deliberate balance work, that signal remains unreliable. Your ankle becomes a mechanical liability on any uneven surface.
The other thing I feel strongly about is the role of early movement. Patients are often surprised when I tell them that staying completely off their ankle for a week actually slows healing. Active rehabilitation, done carefully and progressively, produces better outcomes than passive rest. The research on this is clear, and the clinical results I have seen confirm it consistently.
My honest advice is this. Follow the stages. Do not rush the balance work. And do not stop because the pain stopped. The ankle that stays strong is the one you finished rehabilitating, not the one you babied until it felt okay.
— Ramil
How Stridefootankle supports your recovery
If you are managing a moderate or severe ankle sprain, or if you have already re-injured the same ankle, professional guidance makes a real difference in outcomes. At Stridefootankle, Dr. Nahad Wassel and his team specialize in comprehensive foot and ankle care for patients throughout Las Vegas, from conservative rehabilitation strategies to advanced treatment options when they are needed.
Whether you need a formal assessment to determine your sprain grade, a personalized rehab plan, or evaluation for possible ligament reconstruction, the practice offers targeted physical therapy and nonsurgical treatment approaches tailored to where you are in recovery. You do not have to guess your way through this process. Request an appointment today and get back on your feet with confidence.
FAQ
How long does it take to recover from an ankle sprain?
Recovery depends on severity. Grade I sprains heal in 1 to 2 weeks, Grade II in 3 to 6 weeks, and Grade III in 6 to 12 weeks or longer with proper rehabilitation.
What are the best exercises for ankle sprain recovery?
The best exercises progress by stage: ankle circles and alphabet tracing in weeks 1 to 2, resistance band strengthening and calf raises in weeks 2 to 4, and single-leg balance and wobble board training from week 4 onward.
Can I walk on a sprained ankle?
Light supported walking is appropriate if it is pain-free. If you are limping or experiencing sharp pain, reduce weight bearing and use crutches until symptoms allow comfortable, upright walking.
Why should I continue rehab after the pain goes away?
Stopping rehabilitation early leads to chronic ankle instability and significantly increases the risk of re-injury, even when pain has resolved completely.
When should I see a doctor for an ankle sprain?
Seek evaluation if you cannot bear any weight by day three, notice numbness or tingling, feel the ankle giving way during normal walking, or see no improvement in swelling after two weeks. These symptoms may indicate a fracture or tendon injury.
Recommended
- General Foot & Ankle Care – Stride Foot & Ankle
- How to prepare for foot surgery: steps, recovery, and expert tips – Stride Foot & Ankle – Dr. Nahad Wassel
- How to prevent foot injuries: expert strategies for healthy feet – Stride Foot & Ankle – Dr. Nahad Wassel
- Nonsurgical Options for Tendon and Ligament Injuries – Stride Foot & Ankle – Dr. Nahad Wassel
Recent Comments